
Key takeaways
- Adjusting an empty carrier only: Weight changes the angle and friction at the slider. Always perform a loaded test.
- Using the wrong strap length: A 33-inch add-on strap may be excessive for a small sling and insufficient for a wide piece of gear. Measure the path before buying.
- Mixing incompatible clips: Two buckles may look similar but fail to lock together. Match the width, shape, and manufacturer specifications.
- Relying on a knot to repair damaged webbing: A knot can reduce strength and create a bulky pressure point. Replace compromised webbing instead.
- Over-tightening: Excess tension can deform a bag, damage zippers, pull out stitching, or make the carrier unsafe to wear.
- Ignoring a twisted strap: Twists reduce the contact area inside the adjuster and often cause recurring slippage.
- Overloading the carrier: A tighter strap does not increase the capacity of the bag, clip, seam, or attachment loop.
Loose carrier straps can make a bag, bottle sling, backpack, or gear carrier shift unexpectedly. The problem is more than inconvenience: a strap that slips may put extra strain on your shoulder, pull a load off balance, or let a carrier fall when you bend, climb, or cycle. Over-tightening can also damage webbing, crush the contents, or create uncomfortable pressure points. The safest approach is to identify where the strap is slipping, adjust it in small increments, and test it with the carrier loaded.
This guide explains how to tighten loose carrier straps without twisting the webbing or overloading the hardware. It works for common nylon or polyester straps with sliders, clips, quick-release buckles, and sewn attachment points. For a child carrier, climbing harness, motorcycle restraint, or any load that could cause serious injury if dropped, follow the manufacturer’s instructions instead.
As an Amazon Associate we earn from qualifying purchases at no extra cost to you. Product prices and availability are accurate as of the date shown and are subject to change.

What You Need
| Item | Why | Optional? |
|---|---|---|
| The carrier and its strap | Adjust the actual load-bearing system rather than guessing from an empty bag. | No |
| The item normally carried | A realistic load reveals whether the strap loosens under weight. Stay below the carrier’s stated capacity. | No |
| Bright work light | Helps you inspect stitching, fraying, buckles, and the strap path. | Yes |
| Soft cloth | Removes grit that can prevent a slider or buckle from gripping. | Yes |
| Replacement strap with compatible hardware | Useful if the original webbing, slider, or clip is worn. A two-pack of basic adjustable replacement straps may cost about $7 to $10. | Yes |
| Heavy-duty add-on straps | Helpful for securing bulky gear when the original carrier was not designed for the load. Two-pack tactical straps commonly cost about $12 to $18. | Yes |
| Scissors or a lighter | Only for finishing a replacement strap’s cut end. Use heat carefully and never near the carrier or its contents. | Yes |
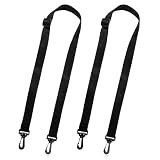
For small bags and bottle carriers, a product such as the EupHHonycs two-pack straps with clips can be a practical replacement option when the length, clip style, and attachment points match. For sleeping bags, tents, and other bulky outdoor gear, Aburbe’s 33-inch tactical straps with quick-release buckles are designed as add-on attachment straps. Neither type should be used beyond its stated purpose or capacity.
Step-by-Step
-
1. Empty and inspect the carrier (3–5 minutes)
Remove everything from the carrier and place it on a clean, flat surface. Look for the point where the strap becomes loose. The problem may be a sliding adjuster, an open buckle, a stretched attachment loop, or broken stitching rather than the strap length itself.
Run your fingers along both sides of the webbing. Replace it if you see cuts, melted areas, severe fuzzing, holes, or a narrowed section. Check that clips are not cracked and that buckles close completely. Do not try to tighten a strap that is attached to torn fabric.
-
2. Identify the adjustment hardware (2–3 minutes)
Most carrier straps use one of three systems. A tri-glide slider lets you shorten or lengthen the strap by routing the webbing through a metal or plastic frame. A ladder-lock buckle uses a toothed center bar to grip the webbing. A quick-release buckle joins two strap ends but usually does not provide the main length adjustment.
Trace the webbing from the carrier’s attachment point to the shoulder pad or handle. Take a quick photo before changing it if the path is confusing. The strap should lie flat, with no half-twist hidden inside the buckle.
-
3. Loosen the adjuster slightly (1 minute)
Lift the loose end or tilt the slider to release tension. Pull out only enough webbing to expose the strap path. For a ladder-lock buckle, press or lift the center bar while feeding the webbing back through. Do not yank on a jammed buckle; forcing it can crack plastic hardware.
-
4. Reroute the webbing correctly (3–5 minutes)
Feed the free end back through the adjuster so the strap makes a firm turn around the gripping bar. On a common tri-glide, the webbing generally passes over the center bar, under or around the opposite bar, and back through the frame. The exact route varies, so match the original path or the manufacturer’s diagram.
Keep the finished side facing outward and make sure the strap is flat from edge to edge. A strap that crosses itself can look tight while slipping under load. Leave at least 2 inches of webbing beyond the adjuster for a small carrier; leave more if the manufacturer specifies a longer tail.
-
5. Pull the strap tight in small increments (2–4 minutes)
Hold the carrier close to the attachment point and pull the free end through the adjuster by 1 to 2 inches at a time. Stop when the carrier sits securely without cutting into your shoulder or restricting movement. For a shoulder bag, the carrier should stay near your side without swinging freely; for a backpack, the shoulder straps should contact your shoulders without leaving large gaps.
Adjust both sides evenly if the carrier has paired straps. Uneven lengths can twist the load and place extra stress on one clip or seam. Avoid tying knots in load-bearing webbing unless the manufacturer specifically permits it.
-
6. Lock and secure the loose tail (1–2 minutes)
Close every buckle until you hear or feel it click, then tug each connection separately. If the strap has a keeper loop, slide the excess tail through it. A loose tail should not hang near wheels, pedals, fans, hot surfaces, or moving parts.
Do not melt the tail with a flame while it is attached to the carrier. If a synthetic strap needs trimming, remove it first, cut it square, and carefully seal the edge in a ventilated area. A melted edge should be smooth, not brittle or burned.
-
7. Test with a realistic load (5–10 minutes)
Load the carrier with the items you normally carry, up to the stated capacity. Start with a light test of about 2 to 5 pounds, then lift and walk with it for several minutes. For a larger gear carrier, increase the load gradually rather than jumping directly to a full pack.
After walking, bending, and gently shifting the carrier, inspect the adjuster and attachment points again. The strap should not have lengthened, the buckle should remain closed, and the stitching should not pull into visible gaps. If it slips, repeat the routing check or replace the hardware.
Mistakes to Avoid
- Adjusting an empty carrier only: Weight changes the angle and friction at the slider. Always perform a loaded test.
- Using the wrong strap length: A 33-inch add-on strap may be excessive for a small sling and insufficient for a wide piece of gear. Measure the path before buying.
- Mixing incompatible clips: Two buckles may look similar but fail to lock together. Match the width, shape, and manufacturer specifications.
- Relying on a knot to repair damaged webbing: A knot can reduce strength and create a bulky pressure point. Replace compromised webbing instead.
- Over-tightening: Excess tension can deform a bag, damage zippers, pull out stitching, or make the carrier unsafe to wear.
- Ignoring a twisted strap: Twists reduce the contact area inside the adjuster and often cause recurring slippage.
- Overloading the carrier: A tighter strap does not increase the capacity of the bag, clip, seam, or attachment loop.
How Often
Inspect straps before every use when carrying heavy, sharp, or expensive items. For an everyday purse, sling, or bottle carrier, perform a closer inspection once a month. Outdoor gear used in rain, mud, sand, or salt water deserves an inspection before and after each trip.
Clean webbing with lukewarm water and a small amount of mild soap. Rinse away grit and let it air-dry fully. Avoid bleach, solvents, fabric softener, and high heat unless the manufacturer approves them. Recheck the adjustment after the first few uses of a new strap, because fresh webbing may settle slightly.
When to Call a Pro or Replace
Replace the strap or carrier if webbing is cut, melted, badly frayed, chemically damaged, or pulled away from its stitching. Replace cracked buckles, bent metal adjusters, and clips that open under a firm hand tug. If a seam has separated, a luggage repair shop, outdoor-gear repair service, or qualified cobbler may be able to restitch it with suitable thread and reinforcement.
Seek professional advice for load-bearing equipment, medical carriers, child carriers, climbing equipment, or anything used where a dropped load could cause injury. Stop using the carrier immediately if it slips during the loaded test, even after correct adjustment. A replacement strap costing roughly $7 to $18 is usually preferable to risking a failure, but it must match the original width, attachment method, and intended load.
FAQ
Why does my carrier strap keep loosening?
The most common causes are incorrect webbing routing, a strap that is twisted, a worn adjuster, smooth or damaged webbing, and an overloaded carrier. Dirt can also prevent the buckle from gripping. Re-route the strap, clean the hardware, and test it with the normal load. If it still slips, replace the strap or adjuster.
How tight should a shoulder carrier strap be?
It should hold the carrier close enough to prevent uncontrolled swinging while allowing comfortable movement and normal breathing. You should be able to slide a couple of fingers between the strap and your shoulder or chest. Tighten both sides evenly and avoid creating a hard pressure point.
Can I add a second strap to stop slipping?
Sometimes. An additional strap can stabilize bulky gear, but only when it attaches to strong, compatible points. It should not be wrapped around a zipper pull, thin lining, or decorative loop. Check the load rating and test the complete setup gradually.
Should I replace the whole carrier or just the strap?
Replace only the strap when the carrier body, attachment loops, and stitching are sound and the replacement hardware matches. Replace the entire carrier when its fabric, seams, clips, or attachment points are damaged, or when the carrier is too small for the load you need to carry.





Write Your Review
No reviews yet. Be the first to share your experience!