
Key takeaways
- Locate structural studs using an electronic stud finder, avoiding drywall anchors alone.
- Screw heavy-duty steel safety brackets into the solid frame of the dresser.
- Keep the changing surface completely clear of hanging window blind cords, electrical wires, wall hangings, or overhead shelves.
- Establish a strict rule: never leave an infant unattended on an elevated surface for any duration.
What's inside
A well-planned changing station setup transforms daily diaper changes from a chaotic scramble into an efficient, safe routine for both parent and newborn. Newborns require between eight and twelve diaper changes every single day, which means parents spend substantial hours hovering over a changing surface. Creating an ergonomic diapering station with essential supplies placed strictly within arm’s reach prevents accidental slips, minimizes lower back fatigue, and keeps sanitation effortless. By organizing wipe dispensers, non-toxic waterproof changing pads, diaper pails, and clean garments ahead of time, caregivers maintain total control and ensure baby safety during every routine change.
Step-by-Step Guide to an Ergonomic Changing Station Setup
Setting up an infant changing station requires meticulous positioning, sanitary surface prep, and rigorous hazard management. Following a systematic sequence ensures your diapering station remains completely secure, accessible, and comfortable during exhausting nighttime routines. Execute each step below to optimize your daily workflow.
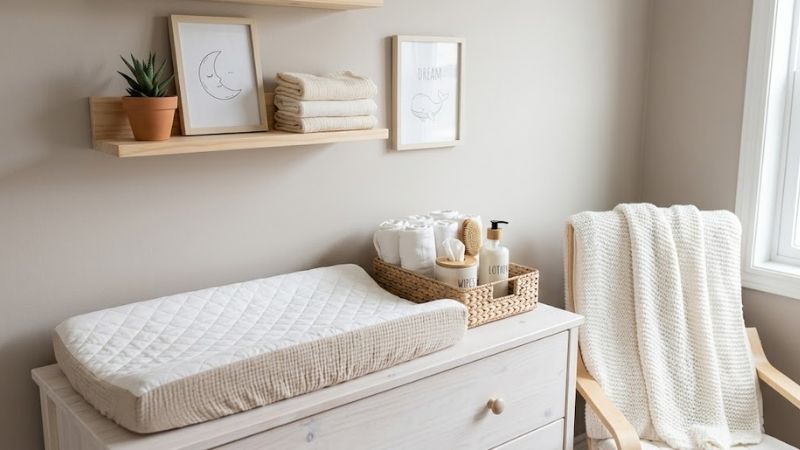
Step 1: Choose the Ideal Station Height and Location
Position your changing table in an area shielded from direct drafts, heating vents, and swinging entry doors. The ideal table height aligns with your hip bones—typically between $36\text{ inches}$ and $42\text{ inches}$ ($91\text{ cm}$ to $107\text{ cm}$) from the floor. This working height prevents parents from hunching forward repeatedly, sparing your lumbar spine and neck muscles from chronic strain. Ensure adequate ambient lighting nearby, ideally paired with a soft nightlight so nighttime diaper checks do not jar an infant awake.
Step 2: Anchor Furniture and Establish Safety Boundaries
Heavy nursery furniture, including dressers and changing tables, presents a tipping hazard once infants begin grasping edges and pulling upward. Fasten your furniture directly into wall studs using heavy-duty anti-tip brackets and safety straps:
- Locate structural studs using an electronic stud finder, avoiding drywall anchors alone.
- Screw heavy-duty steel safety brackets into the solid frame of the dresser.
- Keep the changing surface completely clear of hanging window blind cords, electrical wires, wall hangings, or overhead shelves.
- Establish a strict rule: never leave an infant unattended on an elevated surface for any duration.
Step 3: Install the Changing Pad and Secure Restraints
Affix your contoured changing pad directly to the tabletop or inside a fitted wooden changing tray:
- Fasten the pad’s built-in screw-down safety webbing directly into the back panel of the furniture piece.
- Verify that non-skid rubber feet or silicone pads rest firmly between the changing pad and the wood surface to prevent lateral sliding.
- Keep the integrated safety belt buckled snugly over the infant’s lower torso across every change, even before your child learns to roll.
Step 4: Organize Supplies Using the “One-Hand Rule”
When changing a baby, you must always keep one stabilizing hand resting on your child’s chest or stomach. Everything required to complete a change must be accessible with your remaining single hand:
- Place fresh diapers, unwrapped wipes, and barrier ointments in an open caddy directly adjacent to your dominant hand.
- Store secondary stock—backup packs, sanitizing sprays, and replacement covers—in the top drawer directly underneath.
- Keep items like thermometers, nasal aspirators, and diaper rash zinc paste out of an older infant’s arm reach to prevent accidental ingestion or spills.
Step 5: Implement Odor Control and Waste Disposal Flow
Place your diaper disposal pail immediately beside the station on the floor, rather than inside a closed closet or across the room:
- Select a hands-free, step-pedal or slide-action pail to minimize surface contact with soiled hands.
- Position the pail on the floor on your dominant side, allowing you to drop soiled diapers instantly without pivoting your body away from the baby.
- Keep spare trash liner bags stored right at the bottom of the pail barrel for swift, mid-change bag swaps.
Changing Station Essentials: Tested Equipment Recommendations
Curating the right diapering gear prevents excessive nursery clutter while elevating child safety and hygiene. We evaluated the top products across wipe dispensing, odor sealing, and ergonomic support to ensure your changing corner remains durable, practical, and sanitary. Here are the five standout products for your nursery setup.
1. Wipe-Clean Changing Pad: Keekaroo Peanut Changer
- Best For: Zero-laundry diapering and immediate mess cleanup.
- Key Features: Impermeable polyurethane composite shell, contoured safety edges, integrated restraint belt, slip-resistant base.
- Pros:
- Does not require fabric slipcovers, saving dozens of laundry cycles per week.
- Punctured, waterproof surface resists stains and wipes completely clean with standard antiseptic wipes.
- Heavy base and textured bottom minimize shifting across polished wooden dresser tops.
- Cons:
- Cold to the touch during winter months, occasionally requiring a thin receiving blanket underneath.
- Use Case: Managing liquid blowout messes where fluids can be wiped up in seconds without soaking into foam layers.
- Who It’s For: Caregivers who want an ultra-hygienic, non-porous changing pad that permanently eliminates laundry buildup.
2. Odor-Sealing Diaper Pail: Ubbi Steel Odor Locking Diaper Pail
- Best For: Long-term odor containment without expensive proprietary bag cartridges.
- Key Features: Non-porous powder-coated steel construction, airtight rubber perimeter seals, sliding top access lid, childproof safety turn-lock.
- Pros:
- Steel walls do not absorb bacterial odors over time, unlike standard polyethylene plastic pails.
- Operates with standard $13\text{-gallon}$ kitchen trash bags or washable cloth diaper liners.
- Childproof twist-lock keeps curious toddlers out of the soiled diaper stash.
- Cons:
- Concentrated internal odor vents into the room momentarily when opening the sliding door.
- Use Case: Placing right next to the changing dresser for convenient, sealed waste storage through toddlerhood.
- Who It’s For: Parents seeking superior odor blocking without paying for ongoing proprietary refill cassettes.
3. One-Handed Wipe Dispenser: OXO Tot PerfectPull Wipe Dispenser
- Best For: Effortless, single-wipe dispensing while holding an active baby.
- Key Features: Internal weighted plate, airtight silicone lid gasket, clear front supply indicator window, non-skid rubberized feet.
- Pros:
- Weighted plate holds the rest of the stack down, preventing multiple wipes from pulling out clumped together.
- Silicone gasket seals moisture in, keeping wipes damp from the first sheet to the last.
- Push-to-open lid opens instantly with a simple elbow or single-finger touch.
- Cons:
- Requires unboxing and transferring wipes out of standard manufacturer packaging.
- Use Case: Dispensing exactly one moist wipe with your free hand while maintaining steady grip on a wriggling infant.
- Who It’s For: Parents frustrated by clingy wipe packets that jam, dry out, or lift off the table mid-change.
4. Portable Diaper Organizer: Munchkin Sarabear Portable Diaper Caddy
- Best For: Modular, multi-room organization across split-level homes.
- Key Features: Compartmentalized interior sections, reinforced exterior storage pockets, heavy-duty wide carry handle, firm structural base.
- Pros:
- Structured compartments hold a full day’s supply of diapers, lotions, and replacement onesies.
- Rigid bottom prevents the caddy from sagging or tipping when loaded with full cream tubes and wipes.
- Easily transports from the nursery dresser to living room play yards or bedside bassinets.
- Cons:
- Soft cotton-blend exterior requires hand spot cleaning if diaper creams smear.
- Use Case: Establishing a secondary daytime changing hub on the main floor without duplicating full furniture sets.
- Who It’s For: Families living in multistory houses who need a portable, organized station to avoid running upstairs for every diaper change.
5. Dresser Conversion Tray: Babyletto Universal Wide Removable Changing Tray
- Best For: Converting standard bedroom dressers into dual-purpose changing tables.
- Key Features: Sustainable New Zealand pine construction, included steel mounting brackets, secondary divided side compartment for bottles and ointments.
- Pros:
- Transforms standard wide dressers into secure diaper stations without buying standalone furniture.
- Side compartment keeps messy ointments and lotions upright and separated from the baby’s body.
- Removes cleanly when your child outgrows diapers, leaving the dresser surface unmarked and reusable.
- Cons:
- Requires a minimum dresser top depth of $18\text{ inches}$ to mount safely.
- Use Case: Maximizing floor space in small nurseries by combining clothing storage and diapering on a single surface.
- Who It’s For: Parents building compact nurseries who value long-term furniture flexibility over single-use changing tables.
Buying Guide: How to Choose Changing Station Supplies
Selecting diaper station supplies requires balancing child safety, parent ergonomics, and room space constraints. Flashy infant accessories often clutter flat surfaces without improving utility. Evaluate each diapering product through the criteria below to make sensible long-term investments that protect both your baby and your budget.
1. Working Height & Ergonomic Footprint
- What to look for: Tables, dressers, or conversion trays that place the changing surface precisely between $36\text{ inches}$ and $42\text{ inches}$ from the ground, accompanied by an open base for foot clearance.
- Why it matters: Caregivers bend over a diaper station between $2,500$ and $3,500$ times during an infant’s first year. Poor ergonomic height leads to chronic postural fatigue and neck tension.
- Who needs this: Parents recovering from delivery, tall caregivers, or anyone prone to lower back strain.
- Trade-off: Standalone ergonomic changing tables offer ideal working posture, but they consume dedicated nursery floor space and become obsolete once diapering concludes.
2. Surface Cleanability & Non-Porous Materials
- What to look for: Closed-cell polyurethane surfaces, powder-coated metals, or wipe-clean vinyl devoid of exposed seams and cloth stitch lines.
- Why it matters: Diaper leaks and mid-change accidents frequently discharge onto changing surfaces. Porous foam pads and soft quilted covers soak up fluids, breeding bacteria and mildew.
- Who needs this: Parents managing heavy newborn blowout stages who want quick, sanitizing wipe-downs.
- Trade-off: Solid, non-porous pads resist stains and launder-free maintenance, but they carry a higher upfront purchase price than basic foam pads.
3. Anchoring Mechanisms & Fall Protection
- What to look for: Deep perimeter side barriers (minimum $2\text{ inches}$ to $3\text{ inches}$ height), robust safety restraint buckles, and direct-to-furniture wall mounting hardware.
- Why it matters: Falls from changing surfaces represent one of the leading causes of accidental infant hospital visits once motor skills and rolling behaviors begin around four months.
- Who needs this: Every family, especially those with active infants who roll or kick vigorously during changes.
- Trade-off: Safety straps and rigid side borders slightly constrain your maneuvering space, but they provide indispensable protection during unexpected infant movements.
Frequently Asked Questions About Changing Station Setup
New parents frequently face questions about diapering logistics, spatial layout, and childproofing boundaries. To help you design the most efficient and secure nursery setup, we answered the most common questions regarding safety distances, height ergonomics, and sanitation habits based on pediatric care standards and real feedback.
Can I set up a changing station on an existing dresser?
Yes, transforming a sturdy dresser into a changing station is a practical, space-saving solution. Simply ensure the dresser stands between $36\text{ inches}$ and $42\text{ inches}$ tall, anchor the dresser frame directly into wall studs with anti-tip straps, and secure a contoured changing pad or wooden conversion topper with screws to eliminate sliding.
How many diapers should I store at the changing table?
Keep approximately two to three days’ worth of diapers (roughly $20$ to $30$ diapers for a newborn) in your top-tier caddy or primary drawer. Storing weeks of bulky packs on the tabletop creates visual clutter and restricts arm movement, while storing too few forces you to leave the station during unexpected diaper blowouts.
Do I really need a dedicated diaper pail?
A specialized diaper pail is not legally mandatory, but it is highly recommended for odor management. High-grade diaper pails feature sealed rubber gaskets and sliding portals designed to lock in pungent volatile sulfur compounds. Using an open household trash can allows strong diaper odors to permeate nursery carpets, furniture, and clothing within hours.
Where should I place diaper rash creams and powders?
Store all ointments, petroleum jelly jars, and diaper rash zinc creams on an elevated shelf, in a closed wall-mounted caddy, or inside a partitioned side tray. Ensure these products remain within your adult reach while staying entirely outside your infant’s grasping range, preventing curious hands from ingesting topicals or smearing creams across the station.
Investing time in a structured, ergonomic changing station setup creates a secure and organized hub that eases one of the most repetitive daily parenting duties. By locking down furniture stability, selecting resilient wipe-clean surfaces, and establishing a seamless one-handed supply workflow, you ensure every diaper change is fast, sanitary, and completely safe for your growing baby.










Write Your Review
No reviews yet. Be the first to share your experience!